Sunday, 10 June 2012

Week 9 - Rendering & Cleaning Up

Cleaned Up Version of a DDS.
Magic Wand Tool> Contiguous off> select White> Paint Bucket White> Magic Wand Tool> Select Black> Paint Bucket Black> and done!


Pants filled with my leaf pattern (mirror repeat).
Control T> Warp - then adjust till satisfied!

Saturday, 19 May 2012

Week 10 - Rendering the Body


Rendered Body using 'Dodge' and 'Burn'.
Make to have a layer of the 'outline' separate to the 'skin'.


The rendering of the body is not smooth. But with practice I should be able to execute the 'looks' I want. Make sure to remember to 'make new layer' whenever you are adding another pattern/colour/rendering to your drawing.

Monday, 30 April 2012

Half Drop Repeat & Final Textile Pattern (Block Pattern)

SPICE, KICK & POP

Following the online tutorial (UTSOnline - DFC Folder), I found that although the concept of a Half Drop Repeat Pattern seems simple, this pattern was time consuming in the attempts to achieve no seam lines, and achieve fluidity.


And FIN! :)


I also practiced creating a simple block repeat due to my absence in Week 7.


Designed the chilli pattern on top of my background, defined pattern and then filled a square with my pattern. And Done!! Block Repeat Pattern :)

Motif for Half Drop Repeat Pattern

MOTIF

I wanted to mainly use the chillies and perhaps a leaf or two in my motif. These are the main parts of the plant, which i found to be the most attractive and interesting.
The motifs on the right have been adjusted, in hue and saturation. This change in colour I think brings out the chillies, like a pop of colour you see in the midst of green leaves. I extracted these images using the magnetic tool, direct from my photos.

Background Pattern for Assignment 2

BACKGROUND

For the background I chose to 'define pattern' and 'fill' the page with a mirror repeat pattern from the most common part of the Chilli Plant, the leaf. I chose a rectangle from my images, adjusted the hue and saturation to brighten/spice up the colour scheme.


After manually creating a mirror repeat, I selected a square, defined pattern, and filled the page and ended up with the above pattern. I chose this for the background as it seemed less dominating than the second pattern.


After many tries, I managed to form this second pattern, though the darker green 'striped' sections stood out too much, this pattern almost becoming too dominant. Hence my choice for the first pattern.


This third pattern, although i find interesting and like, to me it loses the 'leaf veiny' look. Distorted so much that it becomes an interesting pattern.

Sunday, 29 April 2012

Spice and Kick!


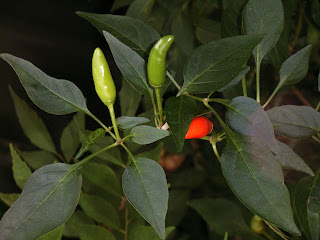
I like the vibrancy of the chilli's colour, the different shades of red and green bursting through the dense ever green leaves.


I like the shapes of the leaves, with the symmetrical veins, beginning from the centre out, similarly as to how the plant grows.


I like the repetition of the leaves down the stems, the chilli growing, sprouting from the centre growing upwards.


When i spotted this little white flower hidden amongst the bright and dominant leaves and chilli i thought it special. It was a minuscule delicate white flower. Like a hidden secret.


 Shape and colour of this leaf formation, I like. Forms an overall (leafy) silhouette.


Another photo of the nearly hidden green chillies , like a subtle surprise, a kick/spice within the plant.


Burst of vibrant red, contrast to the deep green.


These are a couple of the sketches of the leaves i did. The one to the left has much less detail whereas the above sketch has intricate vein detail. 


Using different thickness of inks (when inking the sketches), I applied my knowledge of technical sketches to these. I like the way the thickness and lines of the veins/leaf undulates.

Week 7 Textile Repeats

REPEAT SYSTEMS IN PHOTOSHOP

Although I was away for this lesson, I attempted to create a Toss Repeat Pattern, Half Drop Repeat Pattern and a Full Drop Repeat Pattern on photoshop.

TOSS REPEAT PATTERN IN PHOTOSHOP

1. Open up your motif in photoshop. Then go to Select> All> Edit> Copy. 
2. Open up a new square document. Go to View> Snap to> Layers> View> Snap to> All. (to flatten)
3. Go to View> Rulers and drag your cursor from the horizontal and vertical ruler until they snap to centre giving you a guide to work with. (Four square divisions)
4. Using one of the four sections go to Edit> Paste. Arrange your motif so that it touches the top left hand corner of your chosen square. Edit> Transform> Flip Vertical. Place this part in the bottom right hand corner. 
5. Do the same for the top right but flip the image horizontally. Edit> Transform> Flip Horizontal. 
6. begin to add in the motif but changing the size and positioning using Edit> Free Transform. Toss these about the square. 
7. Using the Rectangular Marquee Tool select that square. Edit> Define Pattern> OK.
8. Open a new document. Go to Edit> Fill. Find your new pattern and select OK. 9.Retouching needs to be done using the 'Spot Healing Brush Tool' by dragging the brush in a zig-zag style across the lines. Or You can use the stamp tool by holding down alt and clicking over the line to conceal the track marks. 


Example of Toss Repeat!

HALF DROP REPEAT PATTERN IN PHOTOSHOP

1. Open up your motif in photoshop. Go to Select> ALL. Edit> Copy
2. Go to Image> Image size. Take  down the pixel measurements for accuracy and success.
3. Go to Filter> Other> Offset. Make sure that the Wrap around is selected. Divide the vertical pixel image size by two and change the horizontal to 0. Click OK.
4. Go to Image> Canvas size and change to percent then click the middle box on the left hand size. Change the Width to 200% and leave the Height as 100%.
5. Go to Edit> Paste (original image you first copied) and move the image directly to the right of the first. Flatten the image.
7. Open a new document. Edit> Fill. Find your new pattern and select OK. 

6. Select> All> Edit> Define Pattern> OK.


Example of Half Drop Repeat!
FULL DROP REPEATS IN PHOTOSHOP
1. Open up your motif in photoshop.
2. Go to Image> Image size and take down the pixel measurements for accuracy and no seam lines.
3. Go to Filter> Other> Offset and divide the horizontal and vertical pixel images sizes by two and enter the new values. Click OK.4. Fix any track marks by using the 'Spot Healing Brush Tool', dragging the brush in a zig-zag style across the lines. Otherwise you can use the stamp tool by holding down 'alt' and clicking over the line to conceal the seam line (break). 
5. Go to Select> All> Edit> Define Pattern> OK.
6. Open a new document in photoshop and go to Edit> Fill. Find your new pattern and select OK. 


And DONE!